Feeds:
Posts
Comments

Archive for the ‘Dinner’ Category

If you’re like me, you like pizza. Maybe you’d go so far as to describe yourself as being moderately obsessed with pizza. Perhaps, if you were forced to spend eternity on a desert island with only one food, you wouldn’t think twice to name pizza as the one dish you’d dine on for the rest of your life. And maybe, just maybe, you’ve spent countless hours devoted to finding the best way to make your own pizza at home.

Now, since we all don’t have the luxury of pulling a Gwyenth Paltrow and building a wood-burning pizza oven in our backyard, the rest of us have to get creative – and resourceful. My absolute fave method for preparing pizza at home is outdoors, as nature intended, on a hot grill. It’s fast, messy and festive, and produces a crispy, superior crust in a flash. Sadly, being an apartment dweller creates an added obstacle in my pizza-making-experimentation. I’m sadly grill-free chez Menu.

Moreover, my kitchen is quite free of any form of ventilation. Anytime I turn the oven on over 400 degrees results in a low level of smoke and a high level of noise from my too-sensitive-but-fully-operational smoke alarms. (Side note: do I really need four smoke alarms in a less-than-900-square-feet apartment?) When performing your own, personal pizza-making research, the first thing that professional pizza-makers will drill in your brain is that you must, must, must crank your oven up to the highest degree possible. And use a pizza stone. After borrowing Mother Menu’s pizza stone for a test run, my beloved smoke alarms had a fit. Apparently, the oils absorbed by the stone do not interact well with my particular brand of kitchen.

I thought I might be on to something when I came upon another category of pizza recipes that call for using the broiler. But my lovely apartment, always conspiring against my pizza consumption, got in the way again with its awkward drawer-style broiler that won’t fit a sizable pan in it.

So here’s the method I developed. I won’t say it’s the most perfect in the world – but it’s the most perfect method for my imperfect, but loveable, little apartment kitchen. It’s inspired by countless recipes I scoured from the Web – but since none fit my kitchen’s peculiarities, I tweaked and adapted and am pretty darn happy with the results.  And since I figure I just can’t be alone in my pizza-making-predicament, I thought I’d share the fruits of my laborious research.  Here’s what to do.

1. Make or buy your dough. I’ve convinced that the dough I purchased through local Richmond company Pizza Tonight is near perfect. I love it. You know how, when you order pizza from a takeout place, everyone fights over the piece of pie that has a huge, charred bubble of doughy goodness on the outer crust? Well, every pie I’ve made with Pizza Tonight dough has resulted in multiple bubbles. More on Pizza Tonight later. If you’re set on making your own dough, I’d recommend this recipe from the Washington Post.

2. Pick a day when you’re experiencing neither blizzard nor heat wave in your community. Open as many doors as possible and turn on all the fans in the house. (Fortunately, to accompany my four smoke alarms, my landlord thoughtfully provided four ceiling fans.) Voila, make-your-own ventilation!

3. Adjust an oven rack to the very lowest setting, closest to the base heating source. Crank up the oven to (gasp) 425 degrees, giving it a good 20-30 minutes to make sure it’s good and hot. (Of course, if you’re in a kitchen with proper ventilation, feel free to preheat to 500 degrees – you’ll likely get better, and slightly quicker, results.)

4. Heat a well seasoned cast iron skillet on the stove top over medium-high heat.

5. While the oven and pan preheat, prepare your dough. Dough should already be at room temperature. If you’re working with a damp dough, cover the ball lightly in flour before holding it in one hand and allowing gravity to do its work, letting the dough “hang”  down, using the other hand to stretch the dough into a rough circle that’s quite thin in the middle without reaching the fully-transparent stage, and no bigger in diameter than your cast iron skillet. Pizza Tonight offers an excellent tutorial on this very subject.

6. Prepare the toppings. My latest favorite combination is fully inspired by Pizza Tonight which, in addition to selling kits of dough and sauce, also sells fresh-from-the-oven baked pies on-site at local farmers markets. I sampled a slice of their Fig & Pig creation and was hooked: fresh figs, prosciutto and Gorgonzola cheese. Yum. For my version, I opted for a combination of pesto, dried figs, fresh mozzarella and prosciutto, layered in that order and using just the thinnest layer of pesto.

7. Nestle the dough carefully in the cast iron skillet and add toppings.

8. Bake for about 8 minutes.

On my first try, I over-baked in hopes that the top crust would magically char. But without an upper heat source (i.e., from a broiler), that’s just not going to happen, so don’t make my mistake. Taking the pizza out after 8 minutes yielded a pizza that was the perfect mixture of crispy and chewy – and thanks to the skillet I still enjoyed some of those tasty char marks on the bottom of the pizza.

So that’s my journey. My greatest discovery? Every pizza is as unique as the kitchen that produces it. So, unless I stay in this particular apartment for life, I’m looking forward to more pizza discoveries in newer and greater kitchens in the future!

Read Full Post »

When the Menu Family realized that a very noteworthy birthday was fast-approaching for our matriarch, we got together to determine the best way to celebrate in style.

Now, my mom threw birthday parties too numerous to count for the three of us Menu kids when we were growing up. And more recently, she’s hosted just bunches of family dinner parties to celebrate our respective births. This is a woman only too deserving of a throw-down good time at her very own birthday bash.

The Logistics
Surprise was the way to go – she’d have put up too many objections, otherwise. We wanted an event that would be fun, casual and filled with good friends and good food. We’d need a space large enough to accommodate a big group of family friends, so we decided to rent a banquet room at our local neighborhood pool. This would be a huge group effort, made possible with the help of the whole family and several amazing friends who served as on-site helpers!

Theme & Decor
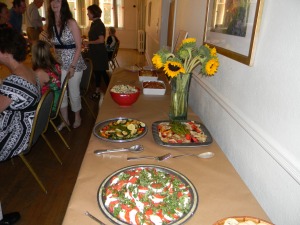
Sunflowers set the color scheme and, subsequently, the general feel and theme of the party. Since the space already had a casual vibe going, we decided to play it up by wrapping the nine 6-foot banquet tables in rolls of brown paper. Center pieces were mason jars wrapped in raffia and filled with miniature sunflowers. Flatware was wrapped in bright orange napkins and tied with a miniature flower pom pom fashioned from brightly colored tissue paper and secured with floral wire (à la Martha Stewart). We topped the dessert and appetizer tables with graphic yellow, brown and blue tablecloths, with more sunflower arrangements and a huge hurricane lamp filled with sunny lemons. More tissue paper pom poms, plus pictures of mom and the family, and loads of bright yellow balloons, finished off the space.

Handmade tissue paper pom poms stood in for napkin rings while raffia-wrapped mason jars served as vases on the paper-wrapped tables.

We decorated the mantle with oversized tissue paper pom poms - plus plenty of photos of the guest of honor, secured to strings of twine with clothespins.

Most Importantly, The Menu
For me, cheerful sunflowers and tables wrapped up in brown paper with raffia-wrapped mason jars screams one thing, and one thing only: rustic Italian. Which is oh-so-fortunate for a certain menu-maker who just happens to love preparing Italian for a crowd! In search of a menu that would be appealing to varied palates, unfussy and, well, just tasty, I settled (after much hemming and hawing) on the following mix. With a guest list of 50, I had to do a good amount of guesstimating on quantities. I must admit that I ran a bit short on a couple of side dishes – see the notes below for some thoughts on quantities for a crowd.

Appetizers

  • Manchego, Peppadew & Prosciutto Bites (was spot-on with 100 bites)
    I’m a fool for the tang of a peppadew, and absolutely crazy about bite-sized appetizers on sticks (witness the Monster Bite). This particular combination was a natural marriage of those two particular obsessions. And it turns out that the pairing of peppadew peppers with nutty manchego and irresistibly salty prosciutto – thinly sliced – is a huge crowd-pleaser. We skewered each bite on a bamboo toothpick, situating a small chunk of cheesy goodness inside the pepper and wrapping the whole shebang in a shred of prosciutto. Since the prosciutto is used so sparingly, you really don’t need to purchase much – 1/4 pound, thinly sliced, would have been plenty for the 100 bites I made (as opposed to the full pound that I foolishly purchased!), combined with about a pound of cubed manchego and several jars worth of peppers. Now, if you’re at home preparing these for a smaller crowd, I can’t help but think that they’d benefit from a quick turn on the grill to lend some crispiness to the prosciutto – but they do pretty well on their own at room temperature, too!
  • Basil Dip with Fresh Veggies (I doubled this recipe, but should have left it alone to adequately feed 50. Several bell peppers, one bunch of celery, about a pound of baby carrots and a few pints of cherry tomatoes are good for dipping.)
    My idea of the perfect summer app, I first conceived of this particular dip for a friend’s birthday shindig last August. It pulls together in a snap, has loads of flavor and is eminently adaptable to whatever herbs you might have on hand. Plus, leftovers make for a terrific sandwich spread.
  • Roasted Grape Tomato Bruschetta (I prepared 80 toasts, and that seemed to be a pretty good quantity.)
    With my main courses already a bit heavy on the meat-factor, I wanted to keep my appetizers fairly vegetarian-friendly. I love this particular dish because the preparation is so painless – just roast grape tomatoes, with plenty of oil, salt and pepper, at a super-high temperature until they absolutely burst. I like to add a bit of sugar to the mix for a touch of sweetness, too. The tomato mixture can be heaped on toasty slices of baguette and served at room temperature – another requirement for all three of my appetizer choices.

Peppadew-Prosciutto-Manchego Bites, Basil Dip & Roasted Grape Tomato Bruschetta.

The Mains

  • Miss Menu’s Lasagna Bolognese for a Crowd (Three 9×12 casseroles was plenty.)
    Someday,  I’m going to have to branch out beyond this traditional favorite. But today was not the day. I can’t tell you enough just how much I love this recipe for an utterly traditional lasagna. I must admit to being something of a recipe-hopper: why repeat the same dish time after time when you can experiment with something new? But the results of this particular combination and preparation of ingredients are just so darn pleasing that I couldn’t pass it up.
  • Eggplant Parmigiana (I only prepared two 9×12 casseroles, but three would have been more appropriate.)
    My eggplant obsession is already all too well chronicled, but this particular version was a new venture for me. As a confessed eggplant parmigiana addict, I wanted this dish to be spot-on. So I conducted a trial run, creating one version with eggplant that was breaded then baked and layered with fresh mozarella, and one version in which I breaded then fried the eggplant before layering it with regular shredded mozzarella. The results were mixed to say the least. I liked the flavor of the fried eggplant, and the crunch of the baked. I liked the heft of the fresh mozzarella, and the meltability-factor of the shredded. So, I decided to combine the best of both worlds. It’s admittedly a labor-intensive dish – but one that’s well worth the effort. See the full recipe below.
  • Orecchiette Pasta with Sausage, Broccoletti & Ricotta (I mixed four pounds of pasta with three pounds of sausage, but could have downgraded to 2-3 pounds of pasta and 2-3 pounds of sausage.)
    Sister Menu, I must admit, saved the day on this particular dish. Being a budget-minded girl, I had purchased a mixture of sweet and spicy sausage from the grocery store for this classic pasta mixture. But when my sister arrived to help with cooking, she insisted on replacing the sub-par sausage with some high-end product from Belmont Butchery. It’s a good thing, too. The sausage was the star of this particular dish, which combined toothsome orecchiette with roasted broccoletti, the aforementioned sweet-and-spicy sausage, a binder of ricotta and plenty of crushed red pepper for kick.
  • Caprese Salad (We used four pounds of mozzarella with seven or eight tomatoes, but five pounds of cheese and nine or 10 tomatoes would have been more appropriate.)
    I know, I know, caprese salad in June is not the best use of tomatoes ever envisioned. But I couldn’t resist offering a huge platter of fresh mozzarella, thick-sliced tomatoes and shredded basil for our guests. Tom Leonard’s, a local Richmond grocery store, makes some of the best frezh mozz I’ve ever tasted. It’s super salty and rich and worth the special 20-minute drive west for a special purchase. We arranged alternating slices on a pretty platter before sprinkling with roughly chopped basil, a drizzle of oil and a healthy pinch or two of salt.
  • Roasted Veggies (I’d recommend at least seven or eight quartered onions, four bunches of asparagus, four or five bell peppers chopped into large chunks and six or seven summer squash.)
    Instead of a traditional salad, we decided to roast up loads of veggies: onions, peppers, zucchini and asparagus all went into the mix. I definitely did not take into consideration ahead of a time how intensive a project it would be to roast enough vegetables to feed 50 people in my little oven.

Setting the stage for the buffet-style Italian feast. Mangia!

The Sweets

  • Hazelnut Tiramisu – Ohmygoshohmygoshohmygosh. This is getting its own special post. Suffice it to say, you’ll want to make a stop by your local American Boys’ Club (perhaps more familiarly known as the ABC store) for a bottle of Frangelico to have on hand so you can run to your kitchen and throw together this dreamy dessert as soon as you read this to-be-written post!
  • Strawberry Trifle – A coffee-and-liqueur-free alternative for the world’s cutest niece and nephew, and all those (crazy people) who are not inclined to try (my new favorite) tiramisu.

Here’s the sure-fire recipe for some delicioso eggplant parmigiana. Other recipes are either linked or described above!

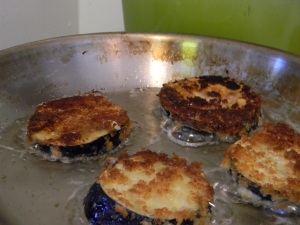
One of the most beautiful sites these eyes have seen: eggplants frying in preparation for the Eggplant Parmigiana.

Eggplant Parmigiana
Makes 1 9×12 casserole, enough to serve 12-15.

2 small- to mid-sized eggplants
2 28-ounce cans San Marzano whole tomatoes in sauce
2 tablespoons olive oil
1 onion
3 cloves of garlic
1 teaspoon crushed red pepper
1 teaspoon dried oregano
1-2 tablespoons sugar
1 large handful basil, about 1 cup chopped and loosely packed
1 cup flour
3 ounces shredded parmesan
4 eggs
4 ounces shredded mozzarella
4 ounces fresh mozzarella
8 slices white bread
Vegetable oil
Salt & pepper

  • Slice eggplants thinly and evenly, about ¼ inch thick, leaving the skin on. Place slices in a colander or on a baking rack placed over the sink, and salt liberally. Let sit for 30 minutes, then press between layers of paper towel.
  • Meanwhile, prepare sauce. Purée San Marzano tomatoes in food processor until slightly chunky. Heat olive oil in a large sauce pan over medium-high heat. Dice onion and garlic, and sauté until the onion is translucent. Season with salt, pepper, crushed red pepper and dried oregano. Mix in tomato mixture and bring to a boil. Reduce heat and simmer for 15 minutes. Stir in basil and sugar, plus salt and pepper to taste. Set aside.
  • Now for the eggplant layers: one baked, one fried. Mix flour with 1 teaspoon salt in a large, sealable plastic bag. Beat eggs in a pie plate or large shallow dish. Pulse bread in food processor to a fine crumb; mix with 1 ounce shredded parmesan and plenty of salt and pepper in another pie plate.
  • For the baked layer: Preheat oven to 400 degrees. Line a cookie sheet with aluminum foil and spray with non-stick cooking spray. Toss half of the dried eggplant slices, 5-6 at a time, in the bag of flour. Shake to rid of excess flour. Dip them in egg, then dredge thoroughly in crumb mixture; set on cookie sheet. Bake for 30 minutes, flipping the slices after 15 minutes.
  • For the fried layer: Repeat the process above with the remaining half of the eggplant slices, tossing 5-6 slices at a time in the bag of flour, followed by a dip in the egg bath and the crumb mixture. Set aside on another platter or cookie sheet. Heat vegetable oil in a large frying pan, about ¼ inch deep – you’ll know it’s hot enough when you flick a drop of water on it and it pops and sizzles. Fry the eggplant in batches, being sure not to overcrowd the pan and refreshing the oil as needed between batches. It will take one or two minutes per side – you’re looking for a golden brown crust. Place fried eggplant on racks lined with paper towels.
  • Once all the eggplant is baked or fried and the sauce prepared, start assembling. Keep the oven heated at 400 degrees. Spray a 9×13 pan with non-stick cooking spray, and pour 1 heaping cup of sauce into the pan and spread to cover. Cover sauce with the layer of fried eggplant, fitting the slices tightly together and overlapping as needed. Sprinkle with the fresh mozzarella. Cover liberally with a heaping cup of tomato sauce. Layer slices of baked eggplant in the same manner as above. Dot with some sauce, about half a cup, and sprinkle with the shredded mozzarella and remaining Parmesan. You’ll have some leftover sauce for serving with the casserole.
  • Tent the casserole dish with foil and bake for 15 minutes. Remove the foil and continue to bake for 5-8 minutes, until browned and crispy. Eat hot or allow to cool completely before wrapping in plastic wrap and foil and freezing for up to three months.

Read Full Post »

This year we celebrated the mothers of our family with a casual dinner chez Menu. I was in the mood for a meal that was the opposite of stuffy. Simple. Light. Tasty. Unfussy, but special enough to pay tribute to the hardworking moms in our midst.

A health-conscious soup & salad combo – followed by a less-health-conscious dessert tart – came to the menu-making rescue. A mellow soup, a bold salad and a rich dessert made for a perfectly lovely Sunday evening with the fam.

I kept things consistent, for a change, and adapted all of my recipes from the Bon Appetit Test Kitchen. I’d add all three to the repeat file.

Flank Steak Salad with Miso Dressing
Serves 6.

  • 4 tablespoons olive oil
  • 4 tablespoons vegetable oil
  • 1 tablespoon soy sauce
  • 1 teaspoon plus 1 tablespoon sesame oil
  • 2 tablespoons brown sugar
  • 1 1- to 1 1/4 pound flank steak
  • 2 tablespoons white or yellow miso
  • 1 two-inch chunk ginger, peeled
  • 1 clove garlic, peeled
  • Salt and pepper
  • 6-8 ounces baby mixed greens
  • 1 seedless cucumber, thinly sliced
  • 1 red bell pepper, thinly sliced
  • 1 large handful cilantro
  • 2-3 spring onions, finely chopped
  • 1 avocado, diced
  • 2 tablespoons sesame seeds, lightly toasted
  • 1 small sourdough baguette, cut into 1-inch cubes

Place 1 tablespoon olive oil, 1 tablespoon vegetable oil, 1 teaspoon sesame oil, soy sauce and brown sugar in a sealable plastic bag with the flank steak. Marinate steak for at least two hours, or overnight.

Puree remaining vegetable and olive oil in food processor with miso, ginger and garlic. Season to taste with salt and pepper.

Heat a large nonstick skillet or grill pan over medium high heat. Remove steak from marinade and grill on each side for about 4 minutes per side. Set aside and tent with foil. Let steak rest for 10-15 minutes.

Preheat oven to 300 degrees. Lay cubed bread on a foil-lined baking sheet and sprinkle with 1 tablespoon sesame oil, salt and pepper. Toast until crispy and lightly browned, about 12 minutes.

Mix greens, cucumber, red pepper, spring onion, cilantro, sesame seeds and toasted croutons in a large bowl. Slice steak diagonally on the bias and add to salad mixture. Toss the whole lot with plenty of miso dressing.

*******************************************************************

Fennel Zucchini Soup
Serves 6.

  • 2 1/2 tablespoons olive oil
  • 2 fennel bulbs
  • 2 zucchini
  • 1 small onion
  • 2 tablespoons fennel seeds
  • 1 quart chicken stock
  • 1 cup grape tomatoes

Lightly toast fennel seeds and grind in a spice grinder or coffee grinder reserved for spices. Set aside.

Thinly slice fennel bulbs, reserving fronts. Fennel is tricky to slice, but don’t worry about slices being slightly mishapen – it will cook down and meet its fate in a blender later, anyhoo. Dice zucchini and onion.

Heat oil over in a large stock pot over medium-high heat. Add fennel, zucchini, onion and fennel seed powder. Saute until vegetables are softened and the fennel is translucent, about 5-6 minutes. Add broth and bring to a boil. Cover, reduce heat and simmer for about 15 minutes. Allow to cool, then puree mixture in a blender or food processor, in batches if necessary. Season with salt and pepper.

Meanwhile, heat 1/2 tablespoon oil in a saute pan. Cut grape tomatoes in half and saute in oil for 2-3 minutes. Season with salt and garnish with reserved fennel fronds. Serve a spoonful of tomatoes in each bowl of hot soup.

*******************************************************************

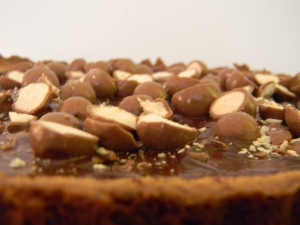
Not one to worry too much about staying virtuous to any particular diet, I knew we had to round out the healthful offerings of the evening with something just a tad bit decadent. Mom and I are both huge fans of malted flavors, as witnessed when Mother Menu undertook the arduous task of creating the behemoth and glorious Chocolate Malt Cake for my birthday last year. I decided to return the favor with a tone-downed version that still featured the malt flavor, but in a cookie tart form. The resulting crust is the perfect mix of crispy and chewy, sweet and salty. And the method couldn’t be more simple.

Chocolate Malt Tart with Crispy Cookie Crust
Serves 8-10.

  • 1 1/2 cups flour
  • 1 cup malted milk powder
  • 1/2 cup sugar
  • 1 teaspoon salt
  • 2 sticks butter, cut into pieces, at room temperature
  • 1/2 heaping cup bittersweet chocolate chips
  • 1 cup malted milk balls, chopped

Preheat oven to 375 degrees.

In food processor, plus flour, malted milk powder, sugar and salt to combine. Add butter and continue to pulse until small clumps form. Turn dough into a tart pan with removable bottom and press evenly along bottom and up edges – the crust will be pretty thick. Prick all over with a fork and tent lightly with foil. Bake for 20 minutes, then remove the foil. Continue to bake for 10-12 minutes, until golden brown.

Remove from oven and immediately sprinkle with chocolate chips, and tent with foil. Let sit for five minutes while the chocolate melts. Remove the foil and spread the chocolate over the top of the cookie crust tart. Sprinkle the still-wet chocolate with malted milk balls and let cool completely before removing from pan. Serve wedges with loads of cold milk.

Read Full Post »

I knew from the start that it would be a risky venture: serving homemade gnocchi to a crowd of 30 for a progressive party seemed more than a little ambitious. But when done well, the end result of the light-as-air, tender-as-a-cloud potato dumpling is so worth the effort that I was willing to risk my kitchen’s cleanliness, my guests’ taste buds and my own personal sanity to produce a dish of gnocchi in gorgonzola cream sauce that, in my naive imagination, would illicit shouts of praise and songs of unending compliments.  Boy, was I stupid.

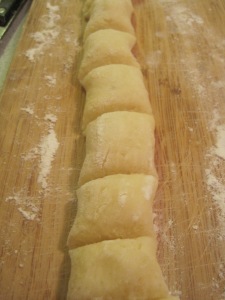
The gnocchi that tried to ruin my sanity.

But let me back up and start from the beginning.  A few colleagues and I decided to join together for some winter festivities and host a three-course progressive dinner. I was eager to take on the entrée course, only to be met by a few semi-surmountable obstacles.

Obstacle 1: My 900-square-foot apartment. With my upstairs and downstairs neighbors out-of-town for the weekend, I didn’t have to worry about bothering fellow apartment-dwellers with our raucous gathering. But I did have to worry about squeezing 30 people into the space – and serving them food with far too few chairs to go around for proper seating! I settled on a banquet of pasta, salad and bread that would require only one utensil for eating. Most of the dishes could be made well in advance with minimal last-minute prep time.

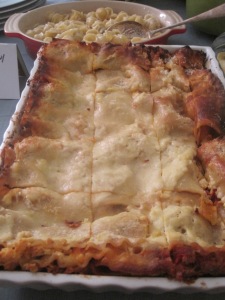
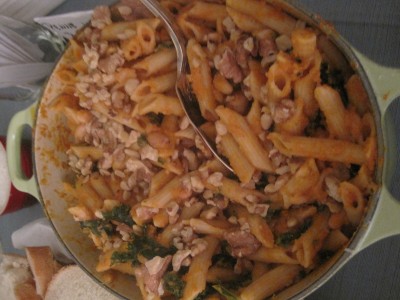
Obstacle 2: Not just any pasta. I wanted this to be a meal to impress, and a bowl of plain old spaghetti just didn’t have the “wow” factor I was looking for. Plus, I wanted some variety – meat and vegetarian, light and rich. I settled on a traditional Bolognese-style lasagna; a super-rich vegetable version of lasagna; a whole-wheat penne in a pumpkin, kale & white bean sauce; and the aforementioned gnocchi in a bath of gorgonzola cream (as inspired by Richmond’s CousCous restaurant).

Obstacle 3: The gnocchi. Oh, the gnocchi. As I’ve mentioned before on this blog, I’ve made gnocchi twice before with mixed results (once resulting in a plastic cutting board melted to the stovetop, and once resulting in dining bliss). With this batch, I was shooting for the latter. I assembled the gnocchi the night before after hours of research – should I boil or bake the potatoes? Use a food mill or a ricer? Add one egg or two? Freeze them or refrigerate until cooking? I settled on the combination of boil-ricer-1.5 egg-freeze. And clearly, it’s not a combo that I recommend. 15 minutes prior to my guests’ arrival, as I plopped the lovingly formed gnocchi into a vat of boiling water, they quickly disintegrated into a bowl of mushy potato and flour soup. Luckily, I had an emergency box of store-bought orecchiette on-hand to save the day, but the indignity of the disintegrated gnocchi might just have scarred me for life.

The progressive dinner spread.

In any event, fun was had by all despite the drama of the gnocchi. The clear winner of the night was the Bolognese lasagna, which I cobbled together from a half-dozen different recipes. The healthy penne dish is also an original creation that is perhaps better suited to a weeknight or family meal, but certainly worth making again.

Miss Menu’s Lasagna Bolognese for a Crowd
Serves 12 (at least!)

  • 2 tablespoons vegetable oil
  • 1 onion, diced
  • 2-3 garlic cloves, finely chopped
  • 1 pound ground beef
  • 1 pound Italian sausage
  • 1 teaspoon dried oregano
  • 1 teaspoon ground fennel
  • 1-2 teaspoons crushed red pepper, to taste
  • 1 teaspoon salt
  • 1/4 teaspoon fresh ground pepper
  • 1/4 cup cream
  • 1 28-ounce can pureed tomatoes
  • 1 28-ounce can diced tomatoes
  • 1 large bunch fresh basil, chopped and divided in half
  • 1 teaspoon sugar
  • 15 ounces ricotta (I use part-skim, but of course whole milk is totally acceptable)
  • 1 egg
  • 2 1/4 cups grated Parmesan
  • 1 pound grated mozzarella
  • 1 box no-boil lasagna noodles

Preheat oven to 375 degrees.

Heat oil over medium heat in a large Dutch oven. Add onion and cook for 2 minutes. Add garlic and saute until the onion is translucent. Add ground beef and sausage, crumbled, and saute until light brown in color, breaking into bits with your spoon. Add the oregano, fennel, crushed red pepper and salt & pepper. Add the cream and simmer for several minutes until most of the liquid evaporates. Add both cans of tomato and simmer for 10 minutes, keeping partially covered and stirring occasionally. Stir in half of basil and sugar. Set aside.

Mix ricotta with one egg. Season ricotta with salt and pepper to taste and mix in grated parmesan and the remaining basil.

Spread 1/4 of the tomato & meat sauce in the bottom of a 9×13 pan. Add one layer of no-boil lasagna noodles and top noodles with 1/4 of the ricotta mixture, spreading to cover noodles as well as possible. Sprinkle 1/4 of the shredded mozzarella over the ricotta. Repeat three more times (starting with the tomato sauce and ending with the mozzarella – you might not use up all the noodles), and sprinkle the extra 1/4 cup Parmesan on top. Take care to make sure the noodles are covered in cheese and sauce, particularly in the corners, to avoid overly crispy noodles.

Cover the dish with foil and bake for 40 minutes. At this point, you can remove the lasagna from the oven, allow to cool COMPLETELY, wrap well in plastic and foil and freeze. Otherwise, remove foil and continue to cook until well browned on top, 15-25 minutes.

To reheat frozen lasagna, allow to thaw to room temperature before baking at 375 uncovered for 25-30 minutes, until top is brown and crispy.

Penne with Pumpkin, Kale & White Beans
Serves 6.

  • 1 pound store-bought penne (I use the Barilla Plus version to pretend I’m healthy)
  • 2 cloves garlic, finely chopped
  • 1 tablespoon vegetable oil
  • 1 can white beans, drained and rinsed
  • 1 large bunch kale, thoroughly cleaned and roughly chopped
  • 1 12-ounce can pumpkin
  • 2-3 cups chicken or vegetable stock
  • 1/2 cup coarsely chopped walnuts, toasted
  • Salt and pepper
  • Crushed red pepper
  • 2 ounces Parmesan Reggiano, finely grated
  • Fresh sage, for garnish

Boil pasta according to package directions.

In a large dutch oven, heat oil over medium heat. Add garlic, and as it starts to brown stir in canned pumpkin and stock. Cook for 2-3 minutes, stirring occasionally, before mixing in beans and kale. Continue to cook until kale is totally wilted, adding more stock to thin out sauce as you see fit. Season with salt, pepper and crushed red pepper.

Stir in cooked pasta a little at a time – you might not want to use the entire box, depending on how “saucy” you like your pasta to be. Top with grated Parmesan, toasted walnuts and finely chopped sage and serve immediately.

Read Full Post »

The theme of the Menu family Christmas meals this year was go big or go home: huge cuts of meat, bold flavors and massive quantities resulted in Christmas Eve and Christmas Day menus that were a study in tasty excess.

Christmas Eve
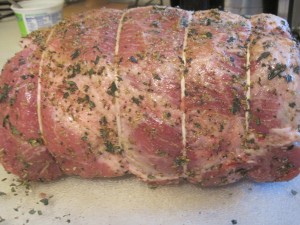
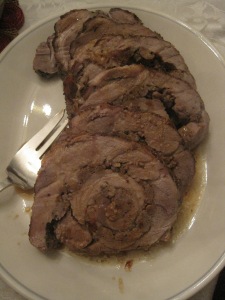
We like to try something new each Christmas Eve meal. Last year we opted for an Italian feast with a layered sausage and broccoli rabe torta. This year we stuck to the pork theme with porchetta: a butterflied, boneless pork shoulder layered with sweet and spicy Italian sausage and rolled tight, with a dry rub of sage, tarragon and fennel.

We tied the pork shoulder tight with twine to keep the sausage stuffing tucked neatly inside.


The end result is a spiral full of pork goodness.

A sweet potato puree, sautéed corn & peppers and a light version of creamed spinach rounded out the menu.

Sweet potatoe puree, corn with peppers and creamed spinach provided a colorful spread of sides.

  • Porchetta – I was thrilled to discover this new-to-me recipe that layers spicy sausage in a reasonably-priced pork shoulder to create a lovely roast that is perfect for entertaining. I found it crucial to have the butcher butterfly the cut for us. And instead of the homemade sausage mixture that the recipe suggests, we had great results with about 3/4 pound spicy Italian sausage and 3/4 pound sweet Italian sausage, and eliminated the egg binder. The dry rub of sage, thyme, fennel and garlic (we omitted the rosemary) was a great addition.
  • Creamed Spinach – The calorie count of this savory side scared me off in the past, but reducing the butter by about half and using a combo of whole milk and two-percent lightens the dish a bit while still leaving it decadent enough for a holiday feast.

Christmas Day
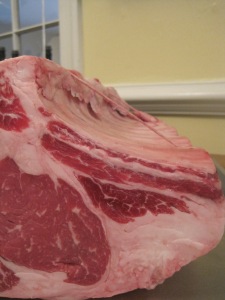
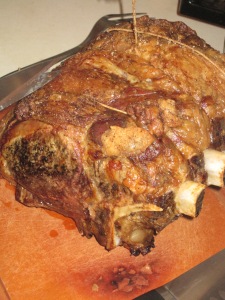
Beef is the name of the game for the Menu Family Christmas day spread, and this year we chose a truly decadent cut. The bone-in rib roast is fatty, tender and quite the stunner, aesthetically speaking.


Before. . .


And after.

Smashed potatoes, haricots verts and airy popovers were the perfect pairing.

The beauty of the perfect popover.

  • Rib Roast – We kept the preparation simple for this cut of meat: just a bit of oil, salt and pepper. We served up some delectable horseradish cream on the side. This site has a helpful chart to determine cooking time for your roast.
  • Perfect Popovers – Popovers are deceptively simple to make and delightfully impressive to serve. You must invest in a popover pan to make these sky-high rolls. The Joy of Cooking recipe proved successful for us, but this one is a close approximation.

The final chapter in the Menu Family holiday menu extravaganza: sweet endings. Lots and lots of sweet endings.

Read Full Post »

Older Posts »